 使用Javascript实现简单的区块链
# 1. 介绍
本文介绍使用JavaScript来实现一个区块链程序
参考Creating a blockchain with Javascript (opens new window) 【需要翻墙】
由于区块链中使用SHA256算法来进行加密,但是JavaScript中默认没有SHA256算法的实现,所以我们需要使用crypto-js实现SHA256算法。
使用npm来安装该crypto-js包
npm install --save crypto-js
1
# 2. 开始
这里就不介绍区块链相关的概念了,直接看实例代码
首先我们使用Visual Studio Code来新建一个main.js文件,用于本次实验。
# 2.1 区块类
首先我们先建立一个区块的类,该类的构造器中需要传入相应的【索引,生成时间,块中存放的数据,上一个链上的HASH值】信息。
在main.js中加入如下代码。
代码如下:
//使用npm install --save crypto-js安装crypto-js包
//引入crypto-js包的sha256模块
const SHA256 = require('crypto-js/sha256');

/**
 * 区块类
 */
class Block {
    constructor(index, timestamp, data, previousHash = '') {
        this.index = index;
        this.timestamp = timestamp;
        this.data = data;
        this.previousHash = previousHash;
        this.hash = this.calculateHash();
    }
    //使用SHA256算法计算HASH值
    calculateHash() {
        return SHA256(this.index + this.previousHash + this.timestamp + JSON.stringify(this.data)).toString();
    }
}
1
2
3
4
5
6
7
8
9
10
11
12
13
14
15
16
17
18
19
20
2
3
4
5
6
7
8
9
10
11
12
13
14
15
16
17
18
19
20
# 2.2 区块链类
有了以上的区块类,需要有一个区块链类来将所有区块连接起来。
该区块链类中,提供了几个方法
| 方法名称 | 方法说明 |
|---|---|
| createGenesisBlock() | 创建创世纪区块(区块链中的第一个区块) |
| getLatestBlock() | 获取区块链中最后一个区块 |
| addBlock(newBlock) | 向区块链中新增一个区块 |
| isChainValid() | 验证整个区块链是否有效,也就是工作量证明 |
在main.js中加入如下代码。
代码如下:
/**
 * 区块链类
 */
class Blockchain {
    constructor() {
        this.chain = [this.createGenesisBlock()];
    }
    //创建第一个区块==>创世纪块【这里为了演示,数据是测试数据】
    createGenesisBlock() {
        return new Block(0, "208/04/14", "Genesis Block", "0");
    }
    getLatestBlock() {
        return this.chain[this.chain.length - 1];
    }
    addBlock(newBlock) {
        newBlock.previousHash = this.getLatestBlock().hash;
        newBlock.hash = newBlock.calculateHash();
        this.chain.push(newBlock);
    }
    //验证区块链是否有效
    isChainValid(){
        for(let i = 1; i<this.chain.length; i++){
            const currentBlock = this.chain[i];
            const previousBlock = this.chain[i-1];
            if(currentBlock.hash != currentBlock.calculateHash() ){
                return false;
            }
            if(currentBlock.previousHash != previousBlock.hash ){
                return false;
            }
            return true;
        }
    }
}
1
2
3
4
5
6
7
8
9
10
11
12
13
14
15
16
17
18
19
20
21
22
23
24
25
26
27
28
29
30
31
32
33
34
2
3
4
5
6
7
8
9
10
11
12
13
14
15
16
17
18
19
20
21
22
23
24
25
26
27
28
29
30
31
32
33
34
# 2.3 测试区块链类
//创建一个区块链类
let myBlockChain = new Blockchain();
//向区块链中添加两个区块
myBlockChain.addBlock(new Block(1, "2018/04/14", { name: 'zhangsan', age: 18 }));
myBlockChain.addBlock(new Block(2, "2018/04/14", { name: 'lisi', age: 20 }));
console.log(JSON.stringify(myBlockChain, null, 4));//打印区块内容
1
2
3
4
5
6
2
3
4
5
6
在命令行直接使用node main.js命令来运行该main.js文件
fangzheng@localhost ~/JavaDev/Visual Studio/blockchain $ node main.js
1
运行后的结果如下:
{
    "chain": [
        {
            "index": 0,
            "timestamp": "208/04/14",
            "data": "Genesis Block",
            "previousHash": "0",
            "hash": "d83f368c882fc30fb396e814fe86b0ad999673e6d8bdab73760112def97e128a"
        },
        {
            "index": 1,
            "timestamp": "2018/04/14",
            "data": {
                "name": "zhangsan",
                "age": 18
            },
            "previousHash": "d83f368c882fc30fb396e814fe86b0ad999673e6d8bdab73760112def97e128a",
            "hash": "5298a99ab0a44edde4dd4f0ed32f3de269da921e0a0baff4bf48256121657305"
        },
        {
            "index": 2,
            "timestamp": "2018/04/14",
            "data": {
                "name": "lisi",
                "age": 20
            },
            "previousHash": "5298a99ab0a44edde4dd4f0ed32f3de269da921e0a0baff4bf48256121657305",
            "hash": "db1192425b0c6b0f1690cfe9a3892c4113039710c5fc236ac4820ee359fb86e7"
        }
    ]
}
1
2
3
4
5
6
7
8
9
10
11
12
13
14
15
16
17
18
19
20
21
22
23
24
25
26
27
28
29
30
31
2
3
4
5
6
7
8
9
10
11
12
13
14
15
16
17
18
19
20
21
22
23
24
25
26
27
28
29
30
31
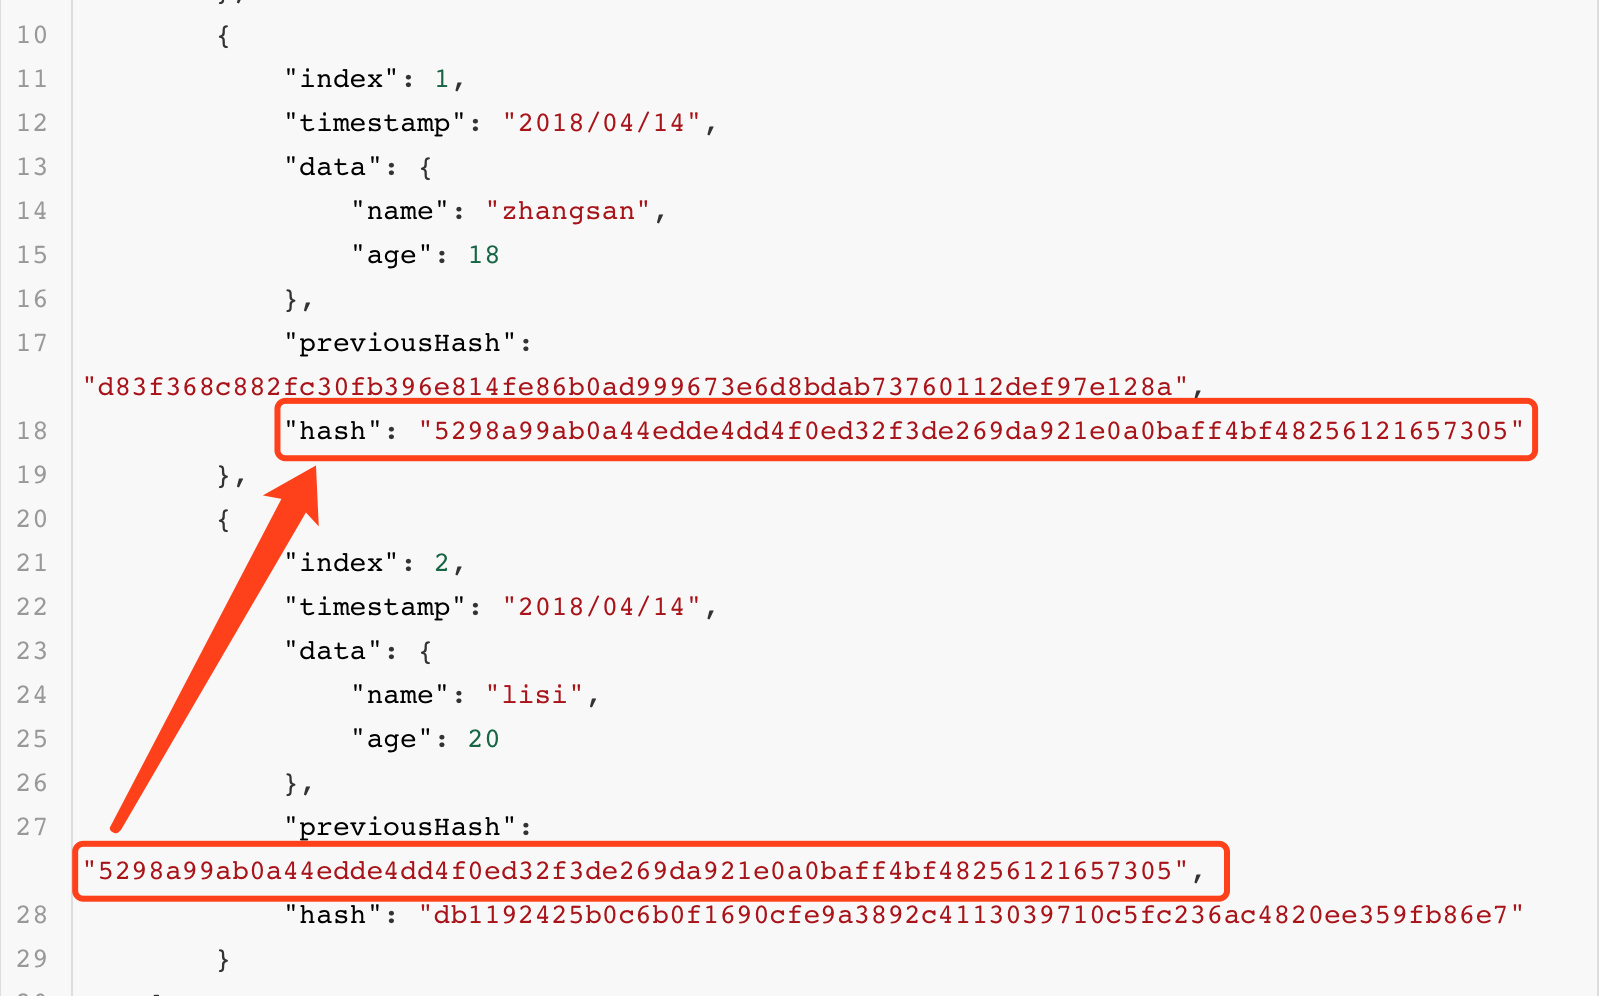
可以看到下一个区块的previousHash 等于 上一个区块的hash值,这样保证将整个区块连接了起来。

# 2.4 测试修改区块链
接下来测试修改区块链中某一个块,然后验证该区块链是否还有效。
第8-11行是新添加的测试代码
//测试
let myBlockChain = new Blockchain();
//向区块链中添加两个区块
myBlockChain.addBlock(new Block(1, "2018/04/14", { name: 'zhangsan', age: 18 }));
myBlockChain.addBlock(new Block(2, "2018/04/14", { name: 'lisi', age: 20 }));
//console.log(JSON.stringify(myBlockChain, null, 4));//打印区块内容

//测试修改区块链
console.log("Is blockchain valid ? "+myBlockChain.isChainValid());
myBlockChain.chain[1].data = {name:'wangwu',age:25};
console.log("Is blockchain valid ? "+myBlockChain.isChainValid());
1
2
3
4
5
6
7
8
9
10
11
2
3
4
5
6
7
8
9
10
11
使用node main.js命令来运行该main.js文件后,打印如下结果:
Is blockchain valid ? true
Is blockchain valid ? false
1
2
2
可以看到没修改之前整个区块链是有效的,修改之后是无效。
# 3. 总结
以上就是简单的使用JavaScript来实现了区块链程序的代码,完整代码如下:
//使用"npm install --save crypto-js" 安装crypto-js包
//引入crypto-js包的sha256模块
const SHA256 = require('crypto-js/sha256');

/**
 * 区块类
 */
class Block {
    constructor(index, timestamp, data, previousHash = '') {
        this.index = index;
        this.timestamp = timestamp;
        this.data = data;
        this.previousHash = previousHash;
        this.hash = this.calculateHash();
    }
    //使用SHA256算法计算HASH值
    calculateHash() {
        return SHA256(this.index + this.previousHash + this.timestamp + JSON.stringify(this.data)).toString();
    }
}
/**
 * 区块链类
 */
class Blockchain {
    constructor() {
        this.chain = [this.createGenesisBlock()];
    }
    //创建第一个区块==>创世纪块【这里为了演示,数据是测试数据】
    createGenesisBlock() {
        return new Block(0, "208/04/14", "Genesis Block", "0");
    }
    getLatestBlock() {
        return this.chain[this.chain.length - 1];
    }
    addBlock(newBlock) {
        newBlock.previousHash = this.getLatestBlock().hash;
        newBlock.hash = newBlock.calculateHash();
        this.chain.push(newBlock);
    }
    //验证区块链是否有效
    isChainValid(){
        for(let i = 1; i<this.chain.length; i++){
            const currentBlock = this.chain[i];
            const previousBlock = this.chain[i-1];
            if(currentBlock.hash != currentBlock.calculateHash() ){
                return false;
            }
            if(currentBlock.previousHash != previousBlock.hash ){
                return false;
            }
            return true;
        }
    }
}
//========================以下是测试代码========================
//测试
let myBlockChain = new Blockchain();
//向区块链中添加两个区块
myBlockChain.addBlock(new Block(1, "2018/04/14", { name: 'zhangsan', age: 18 }));
myBlockChain.addBlock(new Block(2, "2018/04/14", { name: 'lisi', age: 20 }));
//console.log(JSON.stringify(myBlockChain, null, 4));//打印区块内容

//测试修改区块链
console.log("Is blockchain valid ? "+myBlockChain.isChainValid());
myBlockChain.chain[1].data = {name:'wangwu',age:25};
console.log("Is blockchain valid ? "+myBlockChain.isChainValid());
1
2
3
4
5
6
7
8
9
10
11
12
13
14
15
16
17
18
19
20
21
22
23
24
25
26
27
28
29
30
31
32
33
34
35
36
37
38
39
40
41
42
43
44
45
46
47
48
49
50
51
52
53
54
55
56
57
58
59
60
61
62
63
64
65
66
67
2
3
4
5
6
7
8
9
10
11
12
13
14
15
16
17
18
19
20
21
22
23
24
25
26
27
28
29
30
31
32
33
34
35
36
37
38
39
40
41
42
43
44
45
46
47
48
49
50
51
52
53
54
55
56
57
58
59
60
61
62
63
64
65
66
67
最后更新时间: 2022/7/23 12:47:26
